Search This Blog

Thursday, April 28, 2016

Strawberry Hand Pies, similar to "Pop-tarts"

Some days start off better than others.  On this particular day, I was snack parent for my daughter's school.  It was Pajama Day, and I wanted to make a "breakfasty" snack for the kids.  I chose sausage rolls, hard boiled eggs and watermelon.  Our sausage rolls, are simply a mostly cooked sausage rolled in a pie crust wedge and baked.  They are flaky, buttery and delicious.  SO, I was excited to pass on this scrumptious recipe to our pre-school friends.  For the parents, I wanted to make a fruit tart.  I made a tart shell, pastry cream, and bought A TON of fresh fruit. Well, one thing after another...the day didn't work out.... The oven at the school, that has worked for years, stopped working.  So much for sausage rolls.  And then, after assembling the fruit tart and putting in the fridge to set up, it imploded!  We had cold fruit tart soup.  In the end, my perfectly planned out day ended with me having a lot of homemade pie crust and an overload of fruit.  As far as I could tell, I had one choice, make some homemade "pop-tarts".  I guess everything happens for a reason because these are delicious.  I'm still trying to figure out why these are marketed as a breakfast food, because it's clearly a dessert...but whatever.


This is a recipe that is fairly easy, but it takes some time.  Make the pie crust, let it chill.  Make the jam, let it cool.  Then make the hand pies, and let those cool... finally, you have something delicious!  This recipe is also versatile, you can make blueberry jam, raspberry jam, or mixed berry jam.  Maybe some lemon curd and fresh blueberries, or maybe add some mini chocolate chips to the strawberry jam?  And, the toppings... could be sprinkles, could be crushed freeze dried fruit, could be a chocolate drizzle too.  There are lots of options!  So, get creative in the kitchen!
Strawberry hand pies

Strawberry Hand Pies

"Homemade Pop-tarts"


Double recipe of uncooked pie crust, chilled
Strawberry Jam
1 egg mixed with 2 Tablespoons water to make an egg wash
Candy Glaze (optional)
Sprinkles (optional)

Double Pie Crust

2 1/2 cups all-purpose flour
2 Tablespoons white sugar
1 tsp. salt
12 Tablespoons unsalted butter, cut into 1/4 inch pieces and chilled
8 Tablespoons vegetable shortening, cut into 4 pieces and chilled
1/4 cup vodka, chilled
1/4 cup ice water

1.  Process 1 1/2 cups flour, sugar and salt in a food processor until combined, about 5 seconds.  Scatter butter and shortening pieces over top and process until incorporated and mixture begins to form uneven clumps with no remaining floury bits, about 15 seconds.
2.  Scrape down the sides of bowl and redistribute dough evenly around processor blade.  Sprinkle remaining 1 cup flour over dough and pulse until mixture has broken up into pieces and is evenly distributed around bowl, 4-6 pulses.
3.  Transfer mixture to large bowl.  Sprinkle vodka and ice water over mixture.  Stir and press dough together, using a stiff rubber spatula, until dough sticks together.
4.  Divide dough into 2 even pieces. Shape each dough piece into a 4 inch disk.  Wrap in plastic wrap and refrigerate for 1 hour.  Before rolling out dough, let it sit on counter for 10 minutes.  (dough can be refrigerated for up to 2 days or frozen for up to one month.  If frozen then let it thaw out completely before rolling it out)

Strawberry Jam

4 cups strawberries, cut into thick slices
1 cup white sugar
1 Tablespoon fresh lemon juice
1 T vanilla extract

Combine strawberries and sugar in medium saucepan, and bring to a boil, stirring frequently.  Reduce heat to medium and simmer for one hour or until thick, stirring from time to time, making sure that the strawberries don't stick to the bottom of the pan.  When jam is thick, and strawberries have broken down turn off the heat.  The mixture should look like jam at this point.  With the heat off, stir in the lemon juice and vanilla extract.  Cool to room temperature.


To assemble the hand pies.

1.  Pre-heat oven to 425 degrees.  Roll out the chilled pie crust, use a rectangular shaped cookie cutter to cut out shapes, lay rectangle pie crusts onto an ungreased (non-stick) baking sheet.  Add a dollop of strawberry jam to the center of the pie crust.  Use a fork to prick another rectangular pie crust piece, lay the pricked piece on top of the piece with the strawberry jam.  Crimp the edges together with a fork to seal the jam inside the pie crust layers.  Repeat until all the pie crust has been used.  You will probably have extra jam.  (strawberry pin wheel cookies anyone?)
2.  Brush unbaked hand pies with egg wash, and bake for 20 minutes, or until the hand pies are golden brown.
3.  Let cool before eating!  The jam will be very hot, and could burn your tongue!

OPTIONAL toppings!

Glaze
1/2 cup powdered sugar
lemon juice
sprinkles

In a small bowl combine powdered sugar with about a teaspoon of lemon juice. Stir to combine, if the mixture is too thick add more lemon juice.  Stir until the glaze is the consistency that you like.  If the mixture gets too thin, add more powdered sugar.

Drizzle the glaze over the cooled hand pies and then add sprinkles!

Wednesday, April 6, 2016

An Ode to Buttermilk

Buttermilk is so often overlooked as a staple in the house for baking.  Buttermilk is magic.  When you're making your own stuff, you'll find that you use buttermilk all the time.  And, it's not just for baking!  I've used it in meatballs, and it makes a best batter for onion rings and fried chicken.  It makes the tastiest treats ever.  I buy it by the half gallon, make a ton of make ahead stuff, and before I know it the buttermilk is all gone.  Here is a list of my favorite buttermilk recipes!  Cheers!


An Ode to Buttermilk


Buttermilk Pancakes
Buttermilk Waffles
Spaghetti with meatballs and Marinara
Fried Chicken
Onion Rings
Strawberry Shortcakes

This reminds me, I need to add red velvet cake on here!  Check back soon for an update!

Strawberry Shortcake

Oh this is so delicious!  Fresh strawberries, fresh whipped cream and homemade buttermilk shortcakes.  Summer on a plate.  You will not ever need a boxed shortcake mix ever again.  I adapted this recipe from America's test kitchen.  I like to use buttermilk in a lot of my baking.  It definitely worked in this recipe.  It makes A LOT of dessert, so make sure you've got a crowd of hungry eaters.  These are individual desserts as opposed to one giant shortcake.  I like to pass these out to the neighbors if we have leftovers as the shortcakes do not keep.  These are GREAT after a Summer BBQ, when we're in the backyard sipping champagne, and the sun stays out late.  Happy homemade cooking!

Strawberry Shortcake


2 1/2 pounds strawberries, hulled (about 8 cups)
6 Tablespoons white sugar

Biscuits
2 cups all purpose flour
5 Tablespoons white sugar (divided use)
1 Tablespoon baking powder
1/2 teaspoon salt
8 tablespoons butter cut into 1/2 inch pieces, and chilled
2/3 cup buttermilk
1 large egg plus 1 egg white

Fresh Whipped Cream

Prepare fruit: Crush 3 cups strawberries with potato masher in bowl.  Slice remaining berries and stir into crushed berries with sugar.  Let sit at room temperature until sugar has dissolved and berries are juicy, at least 30 minutes and up to 2 hours.

Prepare biscuits:  Preheat oven to 425 degrees, and adjust oven rack to lower-middle position.  Prepare an unrimmed baking sheet, by lining it with parchment paper.  In a food processor pulse flour, 3 tablespoons sugar, baking powder and salt.  Scatter butter pieces over top of and process until mixture resembles coarse corn-meal.  Transfer to a large bowl.

In a separate bowl mix buttermilk and egg until well combined.  Pour over flour mixture and use a rubber spatula to gently fold buttermilk into flour.  When the mixture starts to come together, lightly flour your hand, and gently knead the biscuit dough, in the bowl into a nice ball.  Turn ball out onto lightly floured surfaceand shape into a 9 by 6 inch rectangle about 1 inch thick.  Cut out 6 biscuits using a floured 2 3/4 inch biscuit cutter.  Pat remaining dough into 1 inch thick pieces and cut out 2 more biscuits.  Place cut out biscuits onto prepared baking sheet about 1 inch apart.

In a small bowl whisk together egg white with a bit of water, brush tops of raw biscuits with egg white mixture and sprinkle with remaining 2 tablespoons of white sugar.  Bake biscuits until golden brown, about 12-14 minutes, rotating sheet about 1/2 way through baking.  Let biscuits cool for at least ten minutes (can be stored at room room temperature for up to 1 day)

Prepare fresh whipped cream.  Split each biscuit in half, and place bottoms on individual serving plates.  Generously scoop strawberries onto bottom half of biscuit, add a generous scoop of whipped cream, and then top with other half of biscuit.  Are you drooling yet?  Serve right away.

Onion rings

When we go out to dinner, or a fast food place, I never ordered the onion rings.  When my friends or family ordered the onion rings I had no desire to try one.  Sometimes they were just breading.  You'd bite into one, and this eel-like onion would slip out.  So gross.  Or, they were just a pile of oily breading, and weird looking onions.  I thought blooming onions would be better, but NOPE.  Ever notice that the center of a blooming onion isn't cooked??  Ew, who wants to eat a raw onion in some half-ass batter.  Not me.  But, when my mom is on a quest to find the perfect onion ring, she doesn't give up.  She has come up with the best onion ring recipe that puts all other onion ring recipes to shame.  These onion rings are tasty, light, salty, savory, and just delightful.  A word to the wise, they don't keep.  You cannot fry them ahead.  They are cook and serve side dish.  They are worth it.

*TIP FOR CHOPPING ONIONS.  They only works if you have a gas stove.  Light the burner closest to where you are going to cut the onions.  Do not put a pan on the burner, just let the flame go, and slice the onions.  Not sure why this works, maybe the flames make the onion juice evaporate.  But, I haven't had a problem slicing onions since I learned this trick.


Onion Rings


2-3 large brown onions, peeled and sliced into 1/4-1/2 inch thick rings. (*see tip above for slicing onions)
2 cups buttermilk
4 teaspoons salt
1 teaspoon pepper
2 cups flour
vegetable oil for frying

Put buttermilk, 2 teaspoons of salt and pepper into a ziplock bag, whisk to combine.  Carefully separate sliced onions into rings and place all of the onion rings into ziplock bag with buttermilk.  Seal bag and shake to ensure all onion rings are covered in buttermilk.  Let sit at room temperature for at least 15 minutes, or up to 1 hour.

In another zip-lock bag add 2 cups flour and remaining 2 teaspoons of salt.  Whisk to combine and set aside.  Get a rimmed baking sheet, and place a wire rack on top of it.  This is going to be used to to hold the onion rings until they're ready to fry.  Drain onions from the buttermilk.  Add onion rings to flour mixture a handful at a time.  Shake bag to get onion rings coated with flour.  Place coated onion rings onto prepared baking sheet, and let sit for at least 15 minutes, or up to 1 hour.  

Put enough vegetable oil into a large 10-11 inch wide saucepan to measure approximately 2 inches in depth.  Heat oil to 350 degrees.  And, place a rimmed cookie tray into the oven, and preheat the oven to 200-250 degrees.  When the oil is hot, add a handful of prepared onion rings to the hot oil.  Do not overcrowd the pan, otherwise the onions will not cook evenly, and the oil temp will reduce too much, and your onions will turn into a soggy mess.  You can use a candy thermometer to test the oil temp, or you can test it the old fashioned way.  Set the burner onto medium high heat, let the oil heat for about 10 minutes.  Drop one onion ring into the hot oil.  If the oil starts to make gentle foamy bubbles around the onion ring, then the oil is ready.  If the oil makes no bubbles at all, then its not ready.  If the oil makes searing sounds, emits smoke, or if the onion turns immediately brown then it's too hot.  If the oil is too hot, carefully remove pan from heat for a minute, reduce the heat, and then reheat the oil and re-test.  Keeping the oil at the proper temperature can be tricky.  When you add onion rings, the oil temp will drop because the onions are cooler than the oil.  So make sure the oil is at the right temperature the whole time.  It's not the end of the world if the onion rings aren't perfect.  It's just something to keep in mind. Put the cooked onion rings onto baking sheet and keep warm in oven.

After all onion rings are cooked, remove from oven and sprinkle with salt.  Serve immediately!

Fried Chicken

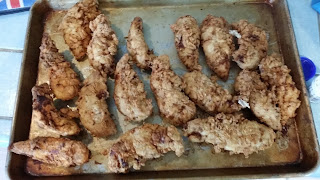
Everything is better when it's homemade.  And, my fried chicken is a classic.  This is a two day recipe, but it's pretty low maintenance, and not a lot of dishes.  It makes enough to feed a hungry family, and it's a crowd pleaser.  I recommend using chicken tenders or drumsticks for this recipe.  I think the drumsticks make for better flavor, but the tenders are easier to eat.  If you only have chicken breasts, cut them into small strips.  Thighs should be fine too, but I've never used thighs for this recipe.  I adapted this recipe from my mom, and her website is Inthekitchenwithpolly.com.  She also has a recipe for pickle fried chicken that is delicious too.

Cold fried chicken is my favorite thing to eat at the beach.  I don't know why that is.  Just something about the waves, the sand, the smell of sunscreen, my happy children, and a leftover chicken drumstick makes my heart dance.  So, when the summer comes along, make a large batch of fried chicken, feed the family, then pack a picnic for a beach day.  My other favorite beach dishes are bagels with cream cheese, pesto pasta, watermelon salad and brownies.  OMG, that sounds amazing!


Fried Chicken

Fried Chicken


Buttermilk marinade
2 cups buttermilk
1/4 cup dijon mustard
1 tablespoon garlic powder
1 tablespoon onion powder
1 Tablespoon salt
1 teaspoon cayenne pepper
1 teaspoon black pepper
4-5 chicken breasts cut into strips, or 10-12 chicken tenders, or 10-12 drumsticks

Whisk all ingredients except into a large ziplock bag until well combined.  Add prepared chicken, and let marinade in refrigerator 1-2 days.

Coating
3 cups all purpose flour
1 Tablespoon baking powder
1 Tablespoon garlic powder
1 Tablespoon onion powder
1 Tablespoon salt
2 tsp. dried mustard powder
1 tsp. cayenne pepper
1 tsp. black pepper

Combine all ingredients in a large bowl.  Add marinated chicken to flour mixture, make sure chicken is coated in flour mixture.  DO NOT SHAKE OFF EXCESS MARINADE OR EXCESS FLOUR MIXTURE.  This part may be ugly and messy, but it's necessary for a tasty, crispy piece of chicken.  Place coated chicken pieces on a rimmed baking sheet, and let sit for at least 1 hour, and up to 2 hours.

To fry chicken, fill a 10-11 inch wide heavy sauce pan with with 1 1/2-2 inches of vegetable oil.  Then preheat oven to 350 degrees.  Place a clean baking sheet in the oven.  Bring oil in saucepan to 350 degrees as well.  You can use a candy thermometer to test the oil temp, or you can test it the old fashioned way.  Set the heat to medium high, let the oil heat for about 10 minutes.  Using long tongs, take a piece of chicken and dip the end into the hot oil.  If the oil starts to make gentle, foamy bubbles around the chicken end, then the oil is ready.  If the oil makes no bubbles at all then it's not ready, if the oil makes searing sounds, emits smoke, or if the chicken turns immediately brown then it's too hot.  If the oil is too hot, carefully remove pan from heat for a minute, reduce the heat, then reheat the pot and re-test the oil.  This is when experience comes in handy, the chicken should turn yellow-golden when cooking, not dark brown or black.  If the oil is too hot then only the outside of the chicken will cook, which will leave the inside of the chicken raw.   And nobody wants raw chicken.

Cook the chicken in the hot oil about 5-7 minutes per batch.  Make sure to flip the chicken over about half way through cooking to ensure even cooking.  Once chicken is golden brown and smelling amazing, remove from oil and place onto cookie sheet in the hot oven.  If the chicken is not cooked from the frying, the oven will finish the cooking process.  The flour coating on the chicken will keep the chicken moist while it's in the oven.  When all the chicken is fried and thoroughly cooked sprinkle with salt and serve immediately.

To make ahead:  When the chicken is cooked, let cool to room temperature.  Place cooked and cooled chicken into tupperware containers, or freezer safe ziplock bags.  Freeze until ready to use, they keep for about a month in the freezer.  To re-heat, heat oven to 350 degrees. Place chicken onto unrimmed baking sheet. Bake for 30 minutes, or until the chicken is hot all the way through.  Serve immediately.

Spaghetti and Meatballs

Comfort food at it's finest.  A large batch of meatballs, good for meatball subs or a large platter of spaghetti with homemade spaghetti sauce.  This is one of those recipes that everyone enjoys, makes great leftovers, and a perfect make ahead or weekend meal.  Buttermilk is used in this recipe because it works.  The buttermilk is slightly tangy, and adds great flavor to the meatballs.

The marinara sauce and the meatballs make great make ahead meals.  They freeze well too.  I've been known to make very large batches of sauce and meatballs, then freeze small portions that we can quickly defrost for meals on the go.

Spaghetti and Meatballs


1 lb. spaghetti
1 batch of Marinara sauce
1 batch of meatballs
parmeasan cheese

Cook spaghetti according to manufacture's instructions.  Meanwhile heat marinara sauce in a large saucepan.  Also, heat meatballs by oven, skillet or microwave, just make sure that you don't try out the meatballs.  When all components have been cooked and heated thorough either combine all components in a very large serving dish, or put them in separate serving dishes.  Serve and enjoy! cheers!

Marinara Sauce

2 Tablespoons olive oil
1 clove garlic
1/2 large onion, or 1 small medium onion, chopped fine

1 lb. button mushrooms, thinly sliced
2 28 oz. cans crushed tomatoes
6 oz. canned tomato paste
1 glass of wine
1/4 cup chopped fresh basil
2 Tablespoons chopped fresh parsley, or 2 tsp. dried parsley
2 bay leaves
pinch of red pepper flakes
salt, pepper and white sugar to taste

In large saucepan over medium heat, add olive oil.  When hot, add garlic, and chopped onion.  Saute until onion is translucent, about 5-7 minutes.  Add mushrooms and cook until mushrooms and onions are browned and soft.  Add remaining ingredients.  Mix all ingredients making sure to break down tomato paste so all ingredients are thoroughly combined.  Bring mixture to a boil, stirring often, making sure nothing sticks to the bottom on the pan.  Taste (careful not to burn your tongue!), season with salt, pepper and sugar.  Reduce heat to low, and let simmer at least 30 minutes until sauce is thick.  Serve with spaghetti.

Meatballs

1 cup panko (seasoned or unseasoned)
1 cup buttermilk
2 pounds ground beef
2 tsp. salt
1/2 tsp. pepper
1 large egg slightly beaten
1/4 cup chopped basil
1/2 cup grated parmesan cheese

Preheat oven to 425 degrees.  Line a rimmed cookie tray with foil, and coat foil with cooking spray.  Combine panko and buttermilk in a large bowl.  Mix buttermilk and panko with a fork until well combined, and the mixture looks like a thick paste.  Add remaining ingredients.  Gently combine so all ingredients are evenly distributed throughout meat.  Get a 1 tablespoon measure, measure out heaping tablespoons of meat mixture, roll into a ball and place onto prepared cookie tray.  Bake for 30 minutes. Let meatballs cool slightly and serve with pasta, and marinara sauce.