Search This Blog

Showing posts with label homemade. Show all posts

Sunday, November 6, 2016

Creamy Tomato Soup

Creamy Tomato Soup


Fall is about family, giving thanks, love, warmth and comfort food. This soup is full of flavor, and full of all the wonders of fall. I recommend eating this soup on a rainy day.

This soup does contain bacon, and chicken broth. Two tablespoons of olive oil, and vegetable broth can be easily substituted to make this soup vegan. The only "thing" about this soup is that it uses every pan in your kitchen, plus the blender!! So, be ready for some dishes, but it's totally worth it!!
Creamy Tomato Soup with Foccacia

  • 4 pieces of thick cut bacon
  • 1 small-medium onion, or 1/2 large onion, chopped fine
  • 60 ounces canned diced tomatoes, drained
  • 2 cups chicken broth (16 ounces, homemade is best)
  • 2 teaspoons of sugar
  • Salt and pepper to taste
  • 1/4 cup fresh chopped basil
  • 1 cup heavy cream
  • Garnishes: chopped cooked bacon, cheddar cheese, Parmesan cheese, sour cream, basil, or croutons.


  1. In a large heavy saucepan over medium high heat, cook the bacon, careful not to burn the bacon.  When done, remove bacon from pan, and set aside to drain.  DO NOT POUR out bacon fat from pan.  Immediately add onion to bacon fat, and saute until onion is translucent and cooked, scraping up all the browned bits.
  2. Add drained tomatoes to onions.  Saute until the tomatoes start to caramelize, and begin to break down.  Add in chicken broth, and season with salt, pepper and sugar.  Let simmer for about 20 minutes, until mixture is thick, and tomatoes have broken down further.  Turn off heat, and let soup cool slightly.  Use the simmer time to chop up the bacon that you cooked earlier.  
  3. 1-2 cups at a time, puree soup in a blender.  The soup will be hot, therefore the steam from the soup will create pressure in the blender.  IF you have too much soup in the blender, the blender will explode open, and you will be covered in hot soup.  This is not fun, this is painful and dangerous.  SO, 1-2 cups of soup, in the blender.  Puree until smooth, and then strain into another large saucepan.
  4. Return soup to a simmer, stir in basil and heavy cream.  Do not let soup boil.
  5. Pour into soup bowls.  Serve with crusty bread, or grilled cheese sandwiches.  Garnish and serve!

Tuesday, September 13, 2016

Shrimp Burgers and House Sweet and Tangy Tartar Sauce

Shrimp Burgers

with Sweet and Tangy Tartar Sauce


1/2 cup panko breadcrumbs
1 pound large shrimp, peeled, deveined, and tails removed
3 tablespoons mayonnaise
2 scallions, sliced thin
2 tablespoons minced fresh parsley
1 teaspoon grated lemon zest
salt, pepper and cayenne pepper to taste (be easy on the cayenne)
1 tablespoon canola oil
Lemon wedges

1. Put shrimp in a food processor and pulse until there is an even mix of finely minced shrimp, and coarsely chopped pieces, about 7 pulses.
2.  Whisk mayonnaise, scallions, parsley, lemon zest salt, pepper and cayenne together in a large bowl.  Gently fold shrimp and bread crumbs into mayonnaise mixture.
3.  Scrape shrimp mixture onto small baking sheet, divide into 4 equal portions, and loosely pack each into 1 inch thick patty.  Cover with plastic wrap and refrigerate for one minute (or up to one day).  NOTE: This would be a good time to make the Sweet and Tangy Tartar Sauce!!
4.  Heat oil in a 12 inch nonstick skillet over medium-high heat until shimmering.  Gently lay shrimp burgers in skillet and cook until crisp and browned on both sides, 8-10 minutes.  Gently transfer burgers to platter and serve with lemon wedges.
To assemble: Serve on soft brioche buns with lettuce, tomato, avocado and tartar sauce.

Sweet and Tangy Tartar Sauce

3/4 cup mayonnaise
1/2 small shallot, minced
2 tablespoons capers, rinsed and minced
2 tablespoons sweet pickle relish
1 1/2 teaspoons white vinegar
1/2 teaspoon Worcestershire sauce
salt and pepper

Combine all ingredients in a bowl, let sit for 15 minutes and season with salt and pepper to taste.

Wednesday, September 7, 2016

Chicken Burrito Mojado's

I'm a sucker for food magazines, and I'm a sucker for America's Test Kitchen, so when I saw the "Special Collector's Edition" of ATK magazine featuring the Best Mexican Recipes, I had to pick it up.  The magazine was sold as soon as I saw "Chicken Mojado Burritos".  These are those giant burritos smothered in red and green sauce that you see at awesome Mexican restaurants.  My sister introduced me to the Chicken Burrito Mojado, and it very quickly caught on with my family.  I don't eat out that often, but I always get the Chicken Mojado Burrito, and now I get to make it at home!!  The red sauce is killer, the green sauce is a bite of pure freshness, the chicken is moist and full of flavor.  Eat this with a knife and fork, and it's good when shared, and it makes great leftovers too.   I recommend serving it with the "Literal Top Shelf Margarita".


Chicken Mojado Burrito

adopted from America's Test Kitchen

2 1/4 cups chicken broth
3/4 cup long-grain white rice, rinsed
1 (15 ounce) can pinto beans, rinsed
3 1/2 tablespoons chili powder
salt and pepper
2 scallions thinly sliced
2 tablespoons vegetable oil
3 garlic cloves, minced
2 (8 ounce) cans tomato sauce
1 1/2 pounds boneless, skinless chicken breasts, trimmed
6 tablespoons minced fresh cilantro
1 package of LARGE flour tortillas
2 avocados, halved, pitted and cut into 1/2 inch pieces
8 ounces monterey jack cheese, shredded (2 cups)
1 1/2 cups tomatillo sauce (recipe included at bottom)
1/2 cup Mexican crema

1.  Bring 1 1/4 cups broth, rice, beans and 1 1/2 teaspoons chili powder and 1/2 teaspoons salt to boil in medium saucepan over medium-high heat.  Cover and reduce heat to low, and cook until rice is tender and broth is absorbed, about 20 minutes.  Remove rice from hear and let sit, covered for 10 minutes.  Add scallions and fluff with a fork to incorporate; cover and keep warm.
2.  Meanwhile, cook oil, garlic and remaining 3 tablespoons chili powder in large saucepan over medium high heat until fragrant 1 to 2 minutes.  Stir in tomato sauce and remaining 1 cup broth and bring to simmer.  Nestle chicken into sauce.  Cover and reduce to medium-low and cook until chicken registeres 160 degrees, 10 to 15 minutes, flipping halfway through cooking.
3.  Transfer chicken to cutting board and let cool slightly.  Using two forks, shred chicken with 1/4 cup sauce and 2 Tablespoons cilantro in bowl.  Set remaining sauce aside.
4.  Adjust oven rack to middle position and heat oven to 450 degrees.  Line baking sheet with alumnium foil.  Wrap tortillas in damp dish towl and microwave until warm and pliable, about 1 minute.  Lay warm tortillas on counter.  Mound rice across the center of each tortilla, close to the bottom edge, then top with chicken avocado and Monterey Jack.
5.  Whisk 2 tablespoons cilantro into the green tomatillo sauce.  Add tomatillo sauce on top of chicken on tortilla.  Working with one tortilla at a time, fold sides and then bottom of tortilla over filling, pulling back on tortilla firmly to tighten it around filling; continue to roll tightly into burrito.  (Burritos can be held up to 1 hour before baking.)  Place burritos seam side down on prepared sheet, cover tightly with foil, and back until hot throughout, 20 to 30 minutes.

6.  Before serving, reheat red sauce in saucepan, over medium heat until hot, about 3 minutes, loosening with water to achieve perfect consistency.  Reheat green sauce in a separate saucepan.
7.  Arrange burritos on individual plates.  Pour red sauce all over burrito.  Top with tomatillo sauce, and drizzle mexican crema over the top of burrito.  Sprinkle with cilantro and serve.


Tomatillo Salsa

1 pound tomatillos, husks and stems removed, rinsed well and dried
1 teaspoon vegetable oil
1 small white onion, cut into wedges
1/2 cup fresh cilantro
1 jalapeno chile, stemmed, halved and seeded
2 tablespoons lime juice
1 garlic clove, minced
salt
2 teaspoons extra virgin olive oil
sugar

1.  Adjust oven rack to 6 inches from broiler element and heat broiler.  Line rimmed baking sheet with aluminum foil.  Toss tomatillos and onion wedges with vegetable oil and transfer to prepared baking sheet.  Broil until tomatillos are spotty brown and skins begin to burst, about 7-10 minutes.  Transfer tomatillos and onions to food processor and let cool completely.
2.  Add cilantro, jalapeno, lime juice, garlic and 1/4 teaspoon salt.  Pulse until slightly chunky, about 20 pulses.  Let sit at room temp for 30 minutes, add olive oil and sugar to taste.

Sunday, August 14, 2016

House Caesar Salad

Caesar Salad is my favorite salad.  It's so simple. Almost too simple, like if one thing gets messed up it could ruin the whole salad.  So, each component needs to be spot on.  Let's start with the dressing.  I used a mayo based dressing because I'm afraid of raw eggs.  Bring on the anchovies though!  My favorite part of Caesar salad is the fact that it pairs really well with a crisp glass of champagne.

Caesar Salad

Dressing
1/2 cup olive oil based mayonnaise
1 2 oz. can anchovies, drained
1 Tablespoon Capers
1 clove garlic
2 Tablespoons Parmesan cheese
juice of 1/2 lemon (to taste)
black pepper (to taste)
Olive Oil (optional, used to thin out the dressing if need be)

Put all ingredients into a blender, blend until smooth.  Taste.  Adjust seasonings if needed with lemon juice, pepper and olive oil.  There should be enough salt in the dressing with the anchovies, and capers.  Set dressing in fridge until ready to use.

Salad
Romaine Lettuce, rinsed, and roughly chopped
Caesar Salad Dressing
Parmesan Cheese
Croutons (homemade is best, see note)
Chicken or Shrimp, seasoned with salt, pepper, garlic and grilled.
Black pepper to taste
OPTIONAL: garlic clove

OPTIONAL STEP: Rub a fresh garlic clove over bowl being used to serve the salad.  Add lettuce to bowl.  Top with Parmesan cheese, fresh croutons, and grilled chicken or shrimp.  Add salad dressing and gently toss salad.  Taste.  Add black pepper to salad.

To Make Croutons: Take a day old baguette and cut into cubes.  Brush olive oil on bread cubes and sprinkle with salt and pepper (if you're adventurous add some garlic powder to the croutons....I'm not a fan of garlic powder).  Bake at 400 degrees for 10 minutes.  If the croutons need more time in the oven, add another few minutes.  When they're golden brown, remove from oven and let dry out and cool on the counter.

Thursday, August 11, 2016

Hoisen Chicken Lettuce Cups

Hoisen Chicken Lettuce Cups


Hoisen Chicken

2 Tablespoons Vegetable Oil
1 Tablespoon chopped peeled fresh ginger
1/2 pound sliced white button mushrooms
4 boneless skinless chicken breasts (I've successfully substituted 1 1/4 pounds of ground turkey), diced into 1/2 inch cubes
8 oz. chopped water chestnuts, drained
1/2 cup hoisen sauce (available in the Asian section of the grocery store)
1 teaspoon salt
4 green onions
1 Tablespoon Worcestershire sauce
1 Tablespoon unseasoned rice vinegar
crunchy chow mein noodles
chopped fresh cilantro
Iceberg lettuce rinsed and drained.  Carefully pull apart leaves to make "cups"

1.  Heat a large wok, or heavy skillet over medium-high heat.  Add oil to pan, and when oil is hot add ginger, and mushrooms.  Saute until ginger is fragrant, and mushrooms are cooked through, and soft.
2.  Add chicken and water chestnuts mushrooms and ginger.  Add more oil if necessary.  Cook until chicken is cooked through.
3.  Add hoisen, salt, green onions, Worcestershire, and rice vinegar to pan.  Combine all ingredients, and let simmer for 5-10 minutes until chicken and sauce are hot and well combined.

To serve: Put Hoisen Chicken in one serving dish, and top with crunchy chow mein noodles and fresh cilantro.  Put the lettuce cups in another serving dish.  Scoop the hoisen chicken into the lettuce cups.  Eat with fingers.  YUM!

Chicken and Crab Egg Rolls

Chicken and Crab Egg Rolls


1 1/2 pound chicken breasts or tenders
12-14 ounces crabmeat drained
1 1/2 cups finely shredded Napa or Chinese cabbage
1 large carrot, grated
4 green onions, sliced fine
1/4 cup chopped fresh cilantro
2 Tablespoons soy sauce
2 Tablespoons dry sherry or rice wine
4 teaspoons cornstarch
2 teaspoons sesame oil
1 teaspoons sesame seeds, toasted
Zest of 1 lime


1 package egg roll wrappers
Vegetable oil for frying


  1. In a medium saucepan add water to fill about half way, and season with 1 teaspoon each of salt and sugar.  Add chicken, and poach until chicken is cooked through about 12-15 minutes.  Remove chicken, let cool slightly, and shred with a fork.
  2. Combine shredded chicken, crabmeat, cabbage, carrot, green onion and cilantro in a large bowl.  In another bowl combine soy sauce, sherry, cornstarch, sesame oil, sesame seeds and lime peel.  Pour sauce over chicken mixture, and stir to combine.
  3. Working with one egg roll wrapper at a time.  Take an egg roll wrapper, and lay it down in front of you so it forms a diamond shape.  Place 1/4 cup of chicken mixture in center of wrapper.  Fold the bottom point of the egg roll wrapper until it almost reaches the top point, making sure it covers the chicken mixture.  Fold each side point over the center, so the points meet in the center.  Dip your finger tips into water, dab the edges of the egg roll wrapper with your wet fingers.  Bring the top point down to seal the egg roll.  Gently seal the egg roll with wet fingers ensuring  that no filling can come out of the wrapper, and that's it's wrapped up tightly.  This step takes some practice.
Add quarter cup filling to bottom half of wanton wrapper
Fold up bottom tip over all of the filling.
Fold side points toward the center of the egg roll, seal seams with wet fingertips
  1. Roll egg roll up tightly, seal all seams with wet fingertips.
    Small white bubbles should quickly form around egg rolls.
    When egg rolls have been wrapped, place seam down onto baking sheet.  Preheat oven to 300 degrees.  And, in a heavy 3 quart saucepan pour in vegetable oil, until it's about 3 inches deep.  Heat oil over medium high heat until 350-365 degrees.  If you don't have a thermometer to check the oil temp, you can carefully dip one end of the egg roll into the hot oil.  It it starts to bubble around the egg roll, then the oil is ready.  
  2. Fry the egg rolls for 2-3 minutes per side, until the wrapper gets golden brown.  Remove egg rolls from hot oil, drain and keep warm in oven.

TO MAKE AHEAD:  Fry egg rolls, and let drain.  Let cool, and then freeze.  Reheat in a 350 oven for about 20 minutes before serving.  

Tuesday, August 9, 2016

House Sausage Patties

If I had a choice between sausage and bacon, I would choose sausage.  And, when I find something I like, I want to make it myself.  This recipe is based off of a Martha Stewert recipe, but I found hers to be slightly mellow and sweet in flavor, also they didn't stay into nice round patties.  I changed the seasonings, and added some breadcrumbs.  These patties are great on their own, but I like to put them on a breakfast sandwich.


sausage pattiesHouse Sausage Patties


1 pound ground pork
1/2 cup breadcrumbs (panko, or homemade)
1 garlic clove, crushed
1 Tablespoon ground sage
3/4 teaspoon ground thyme
1/2 teaspoon caraway seeds
pinch of nutmeg
1 1/2 teaspoons salt
1/2 teaspoon black pepper
1 egg white
2 teaspoons vegetable oil
OPTIONAL: pinch of red pepper flakes

1.  Combine all ingredients, except for the vegetable oil, in a large bowl.  U se a fork to mix ingredients until the spices are evenly distributed.  Chill bowl for approx. 15 minutes.
2.  With clean, cold hands (rinse in cold water), shape pork mixture into patties.  Add vegetable oil into a skillet, over medium-high heat.  When hot, fry patties until cooked through.


Serve and Enjoy!

Saturday, July 23, 2016

Sprinkle Cookies

Not going to lie, I love Real Housewives of whatever...it's a guilty pleasure, I'm not proud of it. But, I love it.  There was an issue in the last episode involving "sprinkle cookies".... which is apparently very offensive to bring to someone's Christmas Eve party.  I don't get the drama, but I'm fascinated.  And, at the end of the episode I had a desire to make sprinkle cookies for my friends, who would never ever throw them away.  I liked this recipe because it's cakey and uses a lot of vanilla.  I would even recommend using a vanilla bean to make these cookies extra special.  These cookies have lots of names like, funfetti cookies, confetti cookies, or sprinkle cookies...but I like the name that Jett has given them, "Donut Cookies"


Sprinkle Cookies
These cookies are basic, and festive.  You are limited by the types of sprinkles that you have in your pantry.  I suggest investing in some colored sprinkles so you can make these beautiful cookies for all occasions.

Sprinkle cookies

aka "Donut Cookies"

3 cups flour
2 teaspoon baking powder
2 teaspoons cream of tartar
1 teaspoon baking soda
1 teaspoon salt
1 cup butter, 2 sticks at room temperature
1 1/2 cups white sugar
1 Tablespoon vanilla, or 1 vanilla bean split seeds removed
2 eggs
1 cup sprinkles

In a medium bowl combine flour, baking powder, cream of tartar, baking soda and salt.  Set aside.

In the bowl of an electric mixer cream the butter, white sugar and vanilla extract or vanilla bean seeds.  Beat until the butter and sugar is light and fluffy.  Gradually add the eggs on at a time, blending well after each addition and making sure to scrape down the sides of the bowl as necessary.

Gradually add the flour, blending well, making sure the dough has the same consistancy throughout.

Chill the dough for one hour.

Preheat the oven to 350 degrees.  Use un-rimmed baking sheets that are either non stick or lined with parchment paper.  Remove dough from fridge, and roll into one inch balls.  Roll each cookie dough ball into the sprinkles and place on prepared baking sheets. Bake for 12 minutes.  Let cool for 3 minutes on the baking sheet, and then transfer to a cooling rack and let cool completely.
Cheers!

Lemon Burst Cookies

(Chocolate Crinkle cookies - chocolate) + Lemon = Lemon Burst Cookies!
They taste like a bite of sunshine, and are perfect on a Summer Day, with a cold iced tea.  No fake lemon crap.

Lemon Burst Cookies

Lemon Burst Cookies


3 cups flour
1/2 teaspoon salt
1/2 teaspoon baking powder
1/4 teaspoon baking soda
1 cup (2 sticks) butter, softened
1 cup granulated white sugar
2 teaspoons vanilla extract
2 eggs
1/4 cup fresh lemon juice
1 Tablespoon lemon zest
yellow food coloring (optional, I did not use)
powdered sugar


In a medium bowl, combine flour, salt, baking powder and baking soda.

In an electric mixer combine butter and sugar and beat until light and fluffy, about 5 minutes.  Add eggs one at a time making sure the eggs are completely mixed in with the butter.  Add vanilla extract, lemon juice and lemon zest.  Mix again until all wet ingredients are well combined, scraping down sides of the bowl as needed.

Scoop the flour mixture into the butter-sugar-egg-lemon mixture, about a cup at a time.  Make sure the flour mixture is well mixed with the butter-sugar-egg-lemon mixture.  The cookie dough should have the same consistency throughout the entire batch.  Cover dough with plastic wrap and place in fridge for about an hour.

Preheat oven to 350 degrees.  Use un-rimmed baking sheets that are either non-stick or lined with parchment paper.

Put 1/2 cup of sugar into a shallow bowl.  Scoop out 1 tablespoon of cookie dough, and roll into a ball.  Then, roll the ball into the powdered sugar and place onto prepared cookie sheet.  Repeat with remaining dough and powdered sugar.

Bake for 12 minutes.  Let cool for 3 minutes on the baking sheet, and then let cool completely on cookie cooling racks.
enjoy!

Wednesday, May 4, 2016

Easy Chicken Toastadas

Serve with corn salad, and a margarita!  Cheers!

Easy Chicken Tostadas


1 pound boneless chicken pieces

2 Tablespoons vegetable oil, plus more oil for frying
1 clove garlic, finely chopped
2 teaspoons cumin
2 teaspoons chili powder
1 teaspoon coriander
1 teaspoon salt
1/2 teaspoon pepper
1/4 teaspoon cayenne pepper
juice of 1 lime
1 can re-fried or black beans
1/2 cup tomatoes, diced
avocado, cut into strips
Cojita Cheese, crumbled
corn tortillas
Adobo Verde Sauce
Other optional toppings: black olives, shredded lettuce, cheddar cheese, salsa, red onion, cilantro

1.  Pre-heat oven to 200 degrees.  Place a cooling rack on top of a baking sheet and place in oven.
2.  Lay chicken pieces onto a cutting board, and pat dry with paper towels.  Slice chicken into small pieces.  Heat oil in a large skillet over medium high heat, when the skillet is almost smoking add garlic, and cook for 30 seconds.  Then add the diced chicken and spices.  Cook until chicken is cooked through.  When done, put into a bowl, cover with foil and set aside, or keep warm in oven.
3.  Heat beans in a small saucepan over medium heat until hot, and warmed through.
4.  In a small skillet, just big enough to fit the corn tortillas, add vegetable oil until about 1/2 inch deep.  Heat oil in skillet over medium high heat, careful not to splash the oil.  When hot, fry corn tortillas until golden brown and crispy.  Keep warm in oven on the prepared baking sheet.
5.  Assemble Tostadas.  On a crispy tortilla, spread on beans, then top with chicken, tomatoes, cojita cheese, avocado and Adobo Verde Sauce.  Add any other toppings that you desire.  Enjoy!

Thursday, April 28, 2016

Strawberry Hand Pies, similar to "Pop-tarts"

Some days start off better than others.  On this particular day, I was snack parent for my daughter's school.  It was Pajama Day, and I wanted to make a "breakfasty" snack for the kids.  I chose sausage rolls, hard boiled eggs and watermelon.  Our sausage rolls, are simply a mostly cooked sausage rolled in a pie crust wedge and baked.  They are flaky, buttery and delicious.  SO, I was excited to pass on this scrumptious recipe to our pre-school friends.  For the parents, I wanted to make a fruit tart.  I made a tart shell, pastry cream, and bought A TON of fresh fruit. Well, one thing after another...the day didn't work out.... The oven at the school, that has worked for years, stopped working.  So much for sausage rolls.  And then, after assembling the fruit tart and putting in the fridge to set up, it imploded!  We had cold fruit tart soup.  In the end, my perfectly planned out day ended with me having a lot of homemade pie crust and an overload of fruit.  As far as I could tell, I had one choice, make some homemade "pop-tarts".  I guess everything happens for a reason because these are delicious.  I'm still trying to figure out why these are marketed as a breakfast food, because it's clearly a dessert...but whatever.


This is a recipe that is fairly easy, but it takes some time.  Make the pie crust, let it chill.  Make the jam, let it cool.  Then make the hand pies, and let those cool... finally, you have something delicious!  This recipe is also versatile, you can make blueberry jam, raspberry jam, or mixed berry jam.  Maybe some lemon curd and fresh blueberries, or maybe add some mini chocolate chips to the strawberry jam?  And, the toppings... could be sprinkles, could be crushed freeze dried fruit, could be a chocolate drizzle too.  There are lots of options!  So, get creative in the kitchen!
Strawberry hand pies

Strawberry Hand Pies

"Homemade Pop-tarts"


Double recipe of uncooked pie crust, chilled
Strawberry Jam
1 egg mixed with 2 Tablespoons water to make an egg wash
Candy Glaze (optional)
Sprinkles (optional)

Double Pie Crust

2 1/2 cups all-purpose flour
2 Tablespoons white sugar
1 tsp. salt
12 Tablespoons unsalted butter, cut into 1/4 inch pieces and chilled
8 Tablespoons vegetable shortening, cut into 4 pieces and chilled
1/4 cup vodka, chilled
1/4 cup ice water

1.  Process 1 1/2 cups flour, sugar and salt in a food processor until combined, about 5 seconds.  Scatter butter and shortening pieces over top and process until incorporated and mixture begins to form uneven clumps with no remaining floury bits, about 15 seconds.
2.  Scrape down the sides of bowl and redistribute dough evenly around processor blade.  Sprinkle remaining 1 cup flour over dough and pulse until mixture has broken up into pieces and is evenly distributed around bowl, 4-6 pulses.
3.  Transfer mixture to large bowl.  Sprinkle vodka and ice water over mixture.  Stir and press dough together, using a stiff rubber spatula, until dough sticks together.
4.  Divide dough into 2 even pieces. Shape each dough piece into a 4 inch disk.  Wrap in plastic wrap and refrigerate for 1 hour.  Before rolling out dough, let it sit on counter for 10 minutes.  (dough can be refrigerated for up to 2 days or frozen for up to one month.  If frozen then let it thaw out completely before rolling it out)

Strawberry Jam

4 cups strawberries, cut into thick slices
1 cup white sugar
1 Tablespoon fresh lemon juice
1 T vanilla extract

Combine strawberries and sugar in medium saucepan, and bring to a boil, stirring frequently.  Reduce heat to medium and simmer for one hour or until thick, stirring from time to time, making sure that the strawberries don't stick to the bottom of the pan.  When jam is thick, and strawberries have broken down turn off the heat.  The mixture should look like jam at this point.  With the heat off, stir in the lemon juice and vanilla extract.  Cool to room temperature.


To assemble the hand pies.
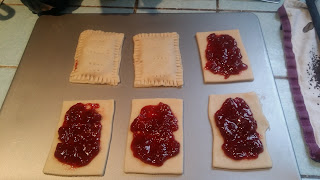
1.  Pre-heat oven to 425 degrees.  Roll out the chilled pie crust, use a rectangular shaped cookie cutter to cut out shapes, lay rectangle pie crusts onto an ungreased (non-stick) baking sheet.  Add a dollop of strawberry jam to the center of the pie crust.  Use a fork to prick another rectangular pie crust piece, lay the pricked piece on top of the piece with the strawberry jam.  Crimp the edges together with a fork to seal the jam inside the pie crust layers.  Repeat until all the pie crust has been used.  You will probably have extra jam.  (strawberry pin wheel cookies anyone?)
2.  Brush unbaked hand pies with egg wash, and bake for 20 minutes, or until the hand pies are golden brown.
3.  Let cool before eating!  The jam will be very hot, and could burn your tongue!

OPTIONAL toppings!

Glaze
1/2 cup powdered sugar
lemon juice
sprinkles

In a small bowl combine powdered sugar with about a teaspoon of lemon juice. Stir to combine, if the mixture is too thick add more lemon juice.  Stir until the glaze is the consistency that you like.  If the mixture gets too thin, add more powdered sugar.

Drizzle the glaze over the cooled hand pies and then add sprinkles!

Wednesday, April 6, 2016

Strawberry Shortcake

Oh this is so delicious!  Fresh strawberries, fresh whipped cream and homemade buttermilk shortcakes.  Summer on a plate.  You will not ever need a boxed shortcake mix ever again.  I adapted this recipe from America's test kitchen.  I like to use buttermilk in a lot of my baking.  It definitely worked in this recipe.  It makes A LOT of dessert, so make sure you've got a crowd of hungry eaters.  These are individual desserts as opposed to one giant shortcake.  I like to pass these out to the neighbors if we have leftovers as the shortcakes do not keep.  These are GREAT after a Summer BBQ, when we're in the backyard sipping champagne, and the sun stays out late.  Happy homemade cooking!

Strawberry Shortcake


2 1/2 pounds strawberries, hulled (about 8 cups)
6 Tablespoons white sugar

Biscuits
2 cups all purpose flour
5 Tablespoons white sugar (divided use)
1 Tablespoon baking powder
1/2 teaspoon salt
8 tablespoons butter cut into 1/2 inch pieces, and chilled
2/3 cup buttermilk
1 large egg plus 1 egg white

Fresh Whipped Cream

Prepare fruit: Crush 3 cups strawberries with potato masher in bowl.  Slice remaining berries and stir into crushed berries with sugar.  Let sit at room temperature until sugar has dissolved and berries are juicy, at least 30 minutes and up to 2 hours.

Prepare biscuits:  Preheat oven to 425 degrees, and adjust oven rack to lower-middle position.  Prepare an unrimmed baking sheet, by lining it with parchment paper.  In a food processor pulse flour, 3 tablespoons sugar, baking powder and salt.  Scatter butter pieces over top of and process until mixture resembles coarse corn-meal.  Transfer to a large bowl.

In a separate bowl mix buttermilk and egg until well combined.  Pour over flour mixture and use a rubber spatula to gently fold buttermilk into flour.  When the mixture starts to come together, lightly flour your hand, and gently knead the biscuit dough, in the bowl into a nice ball.  Turn ball out onto lightly floured surfaceand shape into a 9 by 6 inch rectangle about 1 inch thick.  Cut out 6 biscuits using a floured 2 3/4 inch biscuit cutter.  Pat remaining dough into 1 inch thick pieces and cut out 2 more biscuits.  Place cut out biscuits onto prepared baking sheet about 1 inch apart.

In a small bowl whisk together egg white with a bit of water, brush tops of raw biscuits with egg white mixture and sprinkle with remaining 2 tablespoons of white sugar.  Bake biscuits until golden brown, about 12-14 minutes, rotating sheet about 1/2 way through baking.  Let biscuits cool for at least ten minutes (can be stored at room room temperature for up to 1 day)

Prepare fresh whipped cream.  Split each biscuit in half, and place bottoms on individual serving plates.  Generously scoop strawberries onto bottom half of biscuit, add a generous scoop of whipped cream, and then top with other half of biscuit.  Are you drooling yet?  Serve right away.

Onion rings

When we go out to dinner, or a fast food place, I never ordered the onion rings.  When my friends or family ordered the onion rings I had no desire to try one.  Sometimes they were just breading.  You'd bite into one, and this eel-like onion would slip out.  So gross.  Or, they were just a pile of oily breading, and weird looking onions.  I thought blooming onions would be better, but NOPE.  Ever notice that the center of a blooming onion isn't cooked??  Ew, who wants to eat a raw onion in some half-ass batter.  Not me.  But, when my mom is on a quest to find the perfect onion ring, she doesn't give up.  She has come up with the best onion ring recipe that puts all other onion ring recipes to shame.  These onion rings are tasty, light, salty, savory, and just delightful.  A word to the wise, they don't keep.  You cannot fry them ahead.  They are cook and serve side dish.  They are worth it.

*TIP FOR CHOPPING ONIONS.  They only works if you have a gas stove.  Light the burner closest to where you are going to cut the onions.  Do not put a pan on the burner, just let the flame go, and slice the onions.  Not sure why this works, maybe the flames make the onion juice evaporate.  But, I haven't had a problem slicing onions since I learned this trick.


Onion Rings


2-3 large brown onions, peeled and sliced into 1/4-1/2 inch thick rings. (*see tip above for slicing onions)
2 cups buttermilk
4 teaspoons salt
1 teaspoon pepper
2 cups flour
vegetable oil for frying

Put buttermilk, 2 teaspoons of salt and pepper into a ziplock bag, whisk to combine.  Carefully separate sliced onions into rings and place all of the onion rings into ziplock bag with buttermilk.  Seal bag and shake to ensure all onion rings are covered in buttermilk.  Let sit at room temperature for at least 15 minutes, or up to 1 hour.

In another zip-lock bag add 2 cups flour and remaining 2 teaspoons of salt.  Whisk to combine and set aside.  Get a rimmed baking sheet, and place a wire rack on top of it.  This is going to be used to to hold the onion rings until they're ready to fry.  Drain onions from the buttermilk.  Add onion rings to flour mixture a handful at a time.  Shake bag to get onion rings coated with flour.  Place coated onion rings onto prepared baking sheet, and let sit for at least 15 minutes, or up to 1 hour.  

Put enough vegetable oil into a large 10-11 inch wide saucepan to measure approximately 2 inches in depth.  Heat oil to 350 degrees.  And, place a rimmed cookie tray into the oven, and preheat the oven to 200-250 degrees.  When the oil is hot, add a handful of prepared onion rings to the hot oil.  Do not overcrowd the pan, otherwise the onions will not cook evenly, and the oil temp will reduce too much, and your onions will turn into a soggy mess.  You can use a candy thermometer to test the oil temp, or you can test it the old fashioned way.  Set the burner onto medium high heat, let the oil heat for about 10 minutes.  Drop one onion ring into the hot oil.  If the oil starts to make gentle foamy bubbles around the onion ring, then the oil is ready.  If the oil makes no bubbles at all, then its not ready.  If the oil makes searing sounds, emits smoke, or if the onion turns immediately brown then it's too hot.  If the oil is too hot, carefully remove pan from heat for a minute, reduce the heat, and then reheat the oil and re-test.  Keeping the oil at the proper temperature can be tricky.  When you add onion rings, the oil temp will drop because the onions are cooler than the oil.  So make sure the oil is at the right temperature the whole time.  It's not the end of the world if the onion rings aren't perfect.  It's just something to keep in mind. Put the cooked onion rings onto baking sheet and keep warm in oven.

After all onion rings are cooked, remove from oven and sprinkle with salt.  Serve immediately!

Fried Chicken

Everything is better when it's homemade.  And, my fried chicken is a classic.  This is a two day recipe, but it's pretty low maintenance, and not a lot of dishes.  It makes enough to feed a hungry family, and it's a crowd pleaser.  I recommend using chicken tenders or drumsticks for this recipe.  I think the drumsticks make for better flavor, but the tenders are easier to eat.  If you only have chicken breasts, cut them into small strips.  Thighs should be fine too, but I've never used thighs for this recipe.  I adapted this recipe from my mom, and her website is Inthekitchenwithpolly.com.  She also has a recipe for pickle fried chicken that is delicious too.

Cold fried chicken is my favorite thing to eat at the beach.  I don't know why that is.  Just something about the waves, the sand, the smell of sunscreen, my happy children, and a leftover chicken drumstick makes my heart dance.  So, when the summer comes along, make a large batch of fried chicken, feed the family, then pack a picnic for a beach day.  My other favorite beach dishes are bagels with cream cheese, pesto pasta, watermelon salad and brownies.  OMG, that sounds amazing!


Fried Chicken

Fried Chicken


Buttermilk marinade
2 cups buttermilk
1/4 cup dijon mustard
1 tablespoon garlic powder
1 tablespoon onion powder
1 Tablespoon salt
1 teaspoon cayenne pepper
1 teaspoon black pepper
4-5 chicken breasts cut into strips, or 10-12 chicken tenders, or 10-12 drumsticks

Whisk all ingredients except into a large ziplock bag until well combined.  Add prepared chicken, and let marinade in refrigerator 1-2 days.

Coating
3 cups all purpose flour
1 Tablespoon baking powder
1 Tablespoon garlic powder
1 Tablespoon onion powder
1 Tablespoon salt
2 tsp. dried mustard powder
1 tsp. cayenne pepper
1 tsp. black pepper

Combine all ingredients in a large bowl.  Add marinated chicken to flour mixture, make sure chicken is coated in flour mixture.  DO NOT SHAKE OFF EXCESS MARINADE OR EXCESS FLOUR MIXTURE.  This part may be ugly and messy, but it's necessary for a tasty, crispy piece of chicken.  Place coated chicken pieces on a rimmed baking sheet, and let sit for at least 1 hour, and up to 2 hours.

To fry chicken, fill a 10-11 inch wide heavy sauce pan with with 1 1/2-2 inches of vegetable oil.  Then preheat oven to 350 degrees.  Place a clean baking sheet in the oven.  Bring oil in saucepan to 350 degrees as well.  You can use a candy thermometer to test the oil temp, or you can test it the old fashioned way.  Set the heat to medium high, let the oil heat for about 10 minutes.  Using long tongs, take a piece of chicken and dip the end into the hot oil.  If the oil starts to make gentle, foamy bubbles around the chicken end, then the oil is ready.  If the oil makes no bubbles at all then it's not ready, if the oil makes searing sounds, emits smoke, or if the chicken turns immediately brown then it's too hot.  If the oil is too hot, carefully remove pan from heat for a minute, reduce the heat, then reheat the pot and re-test the oil.  This is when experience comes in handy, the chicken should turn yellow-golden when cooking, not dark brown or black.  If the oil is too hot then only the outside of the chicken will cook, which will leave the inside of the chicken raw.   And nobody wants raw chicken.

Cook the chicken in the hot oil about 5-7 minutes per batch.  Make sure to flip the chicken over about half way through cooking to ensure even cooking.  Once chicken is golden brown and smelling amazing, remove from oil and place onto cookie sheet in the hot oven.  If the chicken is not cooked from the frying, the oven will finish the cooking process.  The flour coating on the chicken will keep the chicken moist while it's in the oven.  When all the chicken is fried and thoroughly cooked sprinkle with salt and serve immediately.

To make ahead:  When the chicken is cooked, let cool to room temperature.  Place cooked and cooled chicken into tupperware containers, or freezer safe ziplock bags.  Freeze until ready to use, they keep for about a month in the freezer.  To re-heat, heat oven to 350 degrees. Place chicken onto unrimmed baking sheet. Bake for 30 minutes, or until the chicken is hot all the way through.  Serve immediately.