Search This Blog

Sunday, January 24, 2016

Sloppy Joes

I had Sloppy Joes once when I was a kid, it was at my friend's house, and I wasn't into them.  I remember it being really sweet, and gross.  So, when I got the America's Test Kitchen cookbook a few years ago, I didn't even look at the recipe, but then I was curious as to what was actually in it.  Upon reading the recipe, It seemed super simple and tasty....so I'm not sure what the problem was when I was a kid.   Anyway, I tried the recipe with my family, and it's quick, super easy and delicious.  It goes really well on the Soft Pretzel Buns.  To keep the cooking to a minimum, serve it with a fresh garden salad.

Ingredients
2 T. Vegetable Oil
1 medium onion, chopped fine
1/2 tsp. chili powder
salt
2 garlic cloves, minced
1 pound 90% lean ground beef
1 cup tomato puree
1/2 cup ketchup
1/4 cup water
1 tsp. brown sugar
hot sauce
hamburger buns, or pretzel buns
Bread and butter pickles


  1. Heat oil in a 12 inch skillet over medium heat until shimmering.  Add the onion, chili powder and 1/2 tsp. salt and cook unil onion is softened, about 5 minutes.  Stir in the garlic and cook until fragrant, about 30 seconds.
  2. Add the beef and cook, breaking up the meat with a wooden spoon, unil almost cooked through but still slightly pink, about 3 minutes.  Stir in the tomato puree, ketchup, water, brown sugar and 1/2 tsp. hot sauce.  Simmer until the sauce is slightly thicker than the ketchup, about 8-10 minutes.
  3. Season with salt and hot sauce to taste.  Spoon mixture over hamburger buns and serve.  Good if served with a pickle.


Variations:
Skinny Joes: substitute ground turkey for ground beef

Smoky Joes: substiture 1/2 cup BBQ sauce for ketchup, serve with onions rather than a pickle


Soft Pretzel Buns

I'm in a cooking club, this month's theme was "One Pot Meals".  I made sloppy joes, and I planned to serve them on soft pretzel buns from Costco (delicious!) BUT, Costco was sold out, so I had to make them myself.  Which means that I totally cheated on the "One Pot Meal" theme...oh well.  These soft pretzel buns were a HIT!  The recipe was adapted from King Arthur Flour, but I made a few adjustments.  Cheers!


Soft Pretzel Buns

Ingredients:
1 3/4 cup warm water
1/4 cup not-fat milk
2 T butter, softened
3/4 tsp. salt
4 3/4 cup all purpose flour
2 1/4 tsp. (or 1 packet) instant yeast

Water Bath:
2 quarts water
1 T. Salt
1/4 cup baking sodas

Topping:
2 T. butter, melted
large grain salt

Put all ingredients into the bowl of an electric mixer with the bread hook attachment.  Combine and knead until all ingredients are well mixed, and the dough starts to pull away from the sides of the bowl, about 5-8 minutes.  Cover the bowl of the mixer with plastic wrap and set aside for dough to rise until doubled in size, about 1 hour.
Get a large rimmed baking sheet, and spray with cooking spray.  Preheat oven to 200 degrees.  Remove the dough from the bowl and shape into one large ball.  Cut the ball of dough into 16 wedges (similar to how you would cut a pizza).  Take each wedge and roll it in your hands to make bun sized rolls, about the size of your palm.  Place each roll onto the greased cookie sheet. When all the dough pieces have been shaped and placed on the baking sheet, then put the baking sheet into the oven and let rise.

While the buns are rising, prepare your water bath.  Put water, salt and baking soda into a large sauce pan, and bring to a boil.  When the water is boiling , remove rolls from oven.  Increase oven temp to 400 degrees.  Gently place 4 rolls at a time in the boiling water.  Boil for 30 seconds on each side, remove from water and place back onto baking sheet.
After all the rolls have been boiled, brush with melted butter and then sprinkle with coarse salt.  Then, with a sharp knife or kitchen scissors, cut a large "X" into the top of each roll.  Bake rolls for 20-25 minutes.

Friday, January 22, 2016

Girls Night In

The girls are coming over tonight.  The key to having a fun casual night in is to keep it simple.  Our party is starting after dinner, so I'm focusing on cocktails, snacks and "Cards Against Humanity".  This is going to be a yoga pants evening.  Normally I would serve Champagne on this event, and of course I had a bottle in the fridge, but my New Years resolution was to drink more cocktails....and this is definitely a cocktail worthy event.

First thing to do is plan.  The perfect girls night cocktail is a Cosmopolitan.  Research done on the drink, sounds feesible, now time to practice.  Well, that's delicious, and the recipe is worth sharing, click HERE to learn to how make a cosmopolitan.

Next thing is food.  I don't want to make anything too fancy.  Girls night just happens to be on a Thursday, everyone (except me) has work tomorrow, so let's keep it casual and focus on the company.  Caramel corn! It's sweet, its addicting, and it isn't too common.  Sounds great to me.  OK, caramel corn done, cosmos prepped, all we need now is for the kids to go to bed, and the fun to start!

The real key to having a superb girls night in is the company.  You can put in a ton of work, but if the girls aren't awesome, the night won't be awesome.  Invite people that you'll have fun with, let your guard down a little bit, be silly and laugh.
Cheers!

French 75

The French 75.  Hands down my favorite cocktail.  Before I tried a French 75, I had been both intrigued and intimidated by it.  Intrigued because it has my two favorite alcohols, champagne and gin.  And, intimidated because it had my two favorite alcohols, champagne and gin.  I had my first French 75 with my friend Sachie.  One of the best foodies I've ever met! Hi Sachie! We spent the day eating and drinking through San Francisco, and around four o'clock we stepped into a wonderful bar and restaurant in San Francisco called Absinthe.  We looked over the menus and, Sachie wanted the French Onion Soup.  I wanted the French 75, then to make it really fun, I decided to order French fries, so we had all things "French" on the menu.  The sexy Cuban guy next to me offered me something else French, and I politely declined.  ;)  The drink was amazing, and it's been my drink of choice ever since.  I hope you enjoy this cocktail as much as I do!


French 75
1 oz. Gin
1/2 oz. lemon juice (a squeeze from a lemon wedge should be enough)
a "swirl" of simple syrup (a very technical term, I know, OK to sub 1/2 tsp. of superfine sugar)
about 2 oz of Champagne, or sparkling wine
Garnish: a lemon twist (Absinthe had these fancy cherries, but I don't know how to make those)

Special Equipment
shaker
ice
champagne flute

Put Gin, lemon juice and simple syrup in a martini shaker over ice.  Shake vigorously, and then strain into a champagne flute.  Top with champagne, gently stir and serve.  Yum!  I'm getting thirsty just thinking about it.
Cheers!

Cosmos!

This is a light, fruity, fun, girly drink.  I've serve it for our Girls Night in, I found this recipe by just doing a google search for "Cosmopolitan Cocktail".  It appeared on the right hand side of my search results, then I adjusted a few of the ingredients for what I had at my bar, and things that I liked.

Cosmopolitan

1 1/2 oz. vodka
1/2 oz. Grand Mariner
1 oz. cranberry juice
juice from 1/2 lime, freshly squeezed
Garnish: Lime Wedge
Special Equipment
Shaker
handheld lime juicer
shot glass for measuring
martini glass
ice

Put all ingredients, except for garnish into a martini shaker with ice.  Put the lid on, shake well, and strain into a martini glass.  Garnish with a lime wedge.
Cheers!


Caramel Corn!

This is one of the best snacks for when you have a crowd!  I've served this on July 4th, Movie Nights and Girls Night in.  It's always a hit!  It also freezer friendly, so it's good to make a bunch, keep in your freezer and bring it out later.  It also can be put into fancy bags and given as a gift.  It's a hundred million times better than any other store bought caramel corn.  It does take some time to make, but it has a long shelf life.  So, make it ahead.  This is another recipe from my mom, you can check out her blog, In the Kitchen With Polly by clicking here: www.inthekitchenwithpolly.com

Caramel Corn


For Popcorn

1 cup popcorn kernels (unpopped...you will be popping your own popcorn for this recipe, it's not hard.  And, after you learn to pop your own popcorn, you'll outlaw bags of popcorn in your own house like I have)
4 T. vegetable oil (do not use olive oil or butter)
NOTE: when you are popping the popcorn, you will be working with 2 T oil, and 1/2 cup popcorn kernels at a time

For Caramel
1 cup butter (DO NOT use oil, or margarine)
2 cups brown sugar
1/2 cup light corn syrup
1 tsp. salt
1/2 tsp. baking soda
1 T vanilla

Special Equipment:
large brown paper bag from a grocery store
oven mitts
Large saucepan with a well fitting lid


Preheat oven to 200 degrees.  Get two rimmed cookie sheets, and set aside.  On the stove top, put 2 T of oil in a large saucepan over high heat.  Add 1 popcorn kernel to the sauce pan and cover with lid.  Stand by the stove until you here the kernel pop, this indicates that the oil is ready.  Add 1/2 cup of popcorn kernels, cover saucepan with lid, and vigorously shake the saucepan.  Make sure you are using oven mitts and hold the lid on the saucepan.  (It could be very dangerous if that lid comes off!)  You will start to hear the popcorn kernels pop, keep shaking.  Shake the pan until you no longer hear the kernels pop.  When the kernels are all popped, remove from heat, and pour the freshly popped popcorn on to the rimmed cookie sheet, place in oven to keep warm.  Repeat this process with remaining oil and popcorn.  You should end up with about 20 cups of popcorn!

Make caramel.  Put butter, brown sugar, corn syrup and salt into another saucepan over medium high heat.  Whisk until well combined, and keep stirring.  Stir the mixture until it begins to boil.  When boiling, remove the whisk from the butter-sugar mixture and let it boil for 4 minutes, at this point DO NOT STIR, just let the heat do the work.  After 4 minutes add the baking soda and vanilla, the mixture will bubble and foam up (that's a good sign!)  Whisk again until all ingredients are well combined.  Smells good, doesn't it?  Turn off heat.


Take popcorn out of the oven, and put into large brown paper bag.  Carefully pour hot caramel in a thin stream over popcorn in large brown bag.  Fold down the top of the bag, and shake bag to completely coat popcorn with hot caramel.  This takes a lot of work, but it's SO WORTH IT!  Cover your rimmed baking sheets with foil, and spray lightly with cooking spray.  Pour caramel coated popcorn onto cookie sheets, and place in oven.  Cook at 200 degrees for 1 hour,  every 15 minutes remove popcorn, toss popcorn, and rotate pans.  Remove from oven and let cool completely.  Break into pieces and serve.

Cheers!

Saturday, January 16, 2016

Like You Mom

We take pictures of everything. Selfies, food, our kids, selfies, pets, art, clouds, selfies, the world around us, friends, the dinner table, more selfies, half face selfies, duck lips, laughter, blurry selfies, feet crossed looking over the ocean, selfies EVERYWHERE!  I often look through pictures of myself on Facebook, and I see myself gradually getting uglier.  Every now and then I see a good picture of myself, and I'm like, "hey, check you out!" But, that's not what I really look like, because I'm wearing makeup.  Whoever she is, she's kind of pretty.  
As I scroll through the pictures, I say to myself, 'Make up Hannah.  Just once in awhile.'  I hate putting on makeup.  I hate how much better I look with makeup on.  I hate that I feel like I need to wear it.  I hate how much my face changes when the makeup comes off.
Zade goes to bed a little later than the two little ones.  We've been getting into the habit of watching TV from my bed, while snuggling in our pajamas.  Tonight, we watched Brie Larson win a Golden Globe for best actress for her role as Ma, in Room.  I read the book. I refused to watch the movie, it just seems too sad.  But, I admired and respected the character, she is one of the strongest female characters in modern literature, and it would have been a very difficult role to play.  As Brie walks up to accept her award, in her beautiful gold sequined dress, looking like classic, sparkling,  Hollywood glam, Zade says, "Oh she's pretty!"
"Yes, she is!" I reply.
"Like you, mom."

Homemade Pizza

This is the perfect dinner for us.  Everyone enjoys a good pizza, and this is the ultimate recipe.  The pizza dough is adopted from America's Test Kitchen, and the sauce is from the best home cook in the world, my mother.  The toppings vary from person to person, and that is what makes this recipe so versatile.  If you have the cash, invest in a pizza oven, it's perfectly seasoned, and makes a a great pizza.  Make the kids pizza's first, so they have time to cool by the time the adults pizza's are ready to go.  And, get the whole family involved in this.  Roll out the dough, ladle the sauce, sprinkle the cheese, make the toppings look like happy faces.


Classic Pizza Dough, recipe credit to America's Test Kitchen: The New Family Cookbook
4 1/4 cups (23 1/3 ounces) bread flour
2 1/4 teaspoons instant or rapid-rise yeast
1 1/2 teaspoons salt
2 Tablespoons olive oil
1 1/2 cups warm water (110 degrees)
Cornmeal (to use later)

1.  Pulse flour, yeast and salt together in food processor to combine, about 5 pulses.  With processor running add oil, then water, and process until rough ball forms, 30 to 40 seconds.  Let dough rest for 2 minutes, ten process for 30 seconds longer.  If dough is sticky, and sticks to the blades after second pulse, add more flour as needed)
2.  Transfer dough to lightly floured counter and knead until smooth, about 1 minute.  Shape dough into tight ball, place in large lightly oiled bowl, and cover tightly with plastic wrap.  (Bowl of dough can be refrigerated up to 16 hours, let sit at room temperature for 30 minutes before using)
3.  Place in warm spot and let dough rise until doubled in size, 1 to 1 1/2 hours.

Classic Pizza Sauce
1 28 ounce can crushed tomatoes
2 T tomato paste
1 Tablespoon dried basil, or 1/4 cup fresh basil chopped fine
1 teaspoon dried oregano or 2 Tablespoons fresh oregano chopped fine
1-2 cloves garlic
salt, pepper and sugar to taste

Combine all ingredients in a medium saucepan.  Bring to a boil, and then reduce heat to medium-low and simmer 30-60 minutes.  Sauce should be thick and rich.


Pizza Assembly

Cooking With an Traditional Oven:  Adjust oven rack to lower-middle position, place baking sheet on rack, and heat to 500 degrees.
Cooking with a Pizza Oven:  preheat pizza oven.

1.  Line rimless baking sheets with parchment paper, or sprinkle with cornmeal.  Transfer dough to lightly floured surface and divide into as many pizzas as you'd like.  You can get 16 mini pizzas, 8 small pizzas, 4 medium or 2 large pizzas.  When our family is making dinner, we make 8 small pizzas.  Working with one piece of dough at a time, (make sure dough not being used is covered with plastic wrap), use fingertips to gently flatten into a disk, leaving one inch of outer edge slightly thicker than center.  Using hands, gently stretch dough into a pizza round.  (Size will vary based on how many pizzas you'll be making).  Transfer dough to prepared baking sheets.

2.  Lightly brush outer 1/2-inch edge of dough with olive oil.  Using a ladle spread pizza sauce evenly over dough, leaving a border.  Sprinkle cheese and any other toppings (see below) you desire.
3.  Bake in oven, or in pizza oven until edges are brown and cheese is golden, about 8-13 minutes, rotating half way through cooking time.
4.  Remove from oven, let cool, cut and enjoy.  

Toppings-Grated mozzarella Cheese, Goat Cheese, Parmesan Cheese, Smoked Gouda, Sausage, Pepperoni, Canadian Bacon, Bacon, Chicken pieces, Mushrooms, Zucchini, Onions, Tomatoes, Olives, Artichoke hearts, Basil, Spinach, Anchovies

This is the beauty of pizza, you can make it your own! If you're using mushrooms or zucchini for your pizza toppings, make sure they're lightly sauteed before being placed on the pizza.

Our Favorite combinations:

"The James"-- Extra sauce, goat cheese, fresh tomato slices and fresh basil
For the boys: red sauce and cheese
For the girl: no sauce, just cheese
For me: Red Sauce, mozzarella, sausage and black olives
Super Cheese: red sauce, mozzarella, smoked gouda, fontina, parmesan and fresh basil.
Diet Pizza: red sauce, all veggies, sprinkle of parmesan

Occasions when we've made pizza!

"Zade's Best Pizza", a fun dinner that Zade planned out all on his own, in which he was restaurant manager/waiter and I was head chef.  We had the family over, Zade made menu's, he took orders, I cooked pizza.  We had so much fun.

Easter lunch!  We shaped the pizza dough to look like eggs, and then we used the toppings to create designs to look like decorated eggs.  Delicious!

Friday, January 15, 2016

Mac and Cheese

There is no need to introduce this recipe.  It's delicious.  You will never buy mac and cheese out of a box ever again.  Enjoy!


Mac and Cheese


2 T butter
1/4 cup flour
1 1/2 cups milk
1 1/2 cups chicken broth
1 T Dijon mustard
3/4 pound (about 4 cups) grated sharp cheddar cheese
1 pound macaroni elbows
salt and pepper to taste

Combine milk and chicken broth in a large microwavable liquid measuring cup and heat for about 3 minutes, OR in a saucepan over medium heat and heat thoroughly.  Make sure the liquid is hot, but not scalding.  Meanwhile, over medium high heat melt butter, and add flour to pan.  Stir until the butter and flour has made a smooth mixture, and the flour taste has cooked out.  Turn off the heat, and slowly whisk in the hot milk and chicken broth a little at time, making sure that after each liquid addition the flour-butter-liquid mixture is smooth and evenly combined.  Keep whisking in the liquid until the mixture is thick and smooth.  Return the pan to heat until the mixture reaches a gentle boil.  Reduce heat and add the mustard, then slowly add the grated cheese, whisking until cheese is melted.  Cover sauce, and keep warm.  Bring 3 quarts of salted water to a boil.  Add macaroni and cook until the macaroni is al dente, about 2-3 minutes LESS than what the suggested boil should be.  Drain pasta, then stir pasta into cheese sauce.  Either serve now, nice and warm.  OR, put it into a greased 9x13 pan, let cool, and keep in refrigerator.  Reheat in 350 degrees until hot.

I portion the mac and cheese into to-go boxes, and freeze them for my kids lunches.

Wednesday, January 13, 2016

Water Bagels

This recipe is courtesy of King Arthur Flour.  My oldest son loves bagels, but I noticed that he wasn't eating them as much.  When I offered to serve him a bagel for breakfast, he declined.  However, if we were going out somewhere, he was very excited to get a bagel at a restaurant, or breakfast place.  When you have a son with extreme picky eating, you need to fix the problem right away, so he will eat again.  So, I tried the bagel that I bought from the store, and it was dry and flavorless.   It became clear why my son was choosing the restaurant bagels over the store bagels.  However, I wasn't going to go out special for him in the morning to get fresh bagels.  I went to a trusted resource, King Arthur Flour.  I found this recipe for Waterbagels, and it was delicious!  The whole family went bonkers for fresh bagels.  Its a new family favorite.
King Arthur Flour is a well known baking company that has tons of products and recipes.  This recipe is a straight forward, beginner bagel recipe.  But you can go to their website and get more great recipes, King Arthur Flour.  If you get stuck, King Arthur Flour has a baking hotline, that you can call for help, it's at the top of their website.  Good luck! Happy Bagels!

Water Bagels

Ingredients
1 Tablespoon active dry yeast
2 cups water, warm
1/4 cup instant malted milk powder or non-diastatic milk powder
2 Tablespoons granulated sugar
1 Tablespoon salt
5 3/4 cup King Arthur unbleached all purpose flour 

Water Bath

2 quarts water
2 Tablespoons instant malted milk powder or non-diastatic milk powder
1 Tablespoon granulated sugar

Instructions

In a large bowl, dissolve the yeast in the warm water. Stir in the malt and sugar, then the salt and flour. Knead the dough till smooth (by hand, mixer or machine). Shape the dough into a ball, place it in a lightly greased bowl covered with lightly greased plastic wrap, and allow it to rise till doubled in bulk, 1 to 1 1/2 hours. 

When the dough has risen, punch it down and transfer it to a lightly greased work surface. Put the water into a large, shallow pan -- the water should be about 3 inches deep -- and add the malt and sugar. Bring the water to a boil while you're shaping the bagels.


Divide the dough into 16 pieces. Working with one piece of dough at a time, shape it into a ball, poke a hole through the center with your index finger, and twirl; the dough will form a ring. Place the bagels on a parchment-lined baking sheet as they're shaped. Boil them immediately, or let them rise a bit.


Reduce the boiling water bath to a very gentle simmer. Gently transfer the bagels, 3 or 4 at a time, to the water bath; don't crowd them. Simmer them for about 30 seconds on each side, then return them to the baking sheet. 


Bake the bagels in a preheated 425°F oven for 20 minutes, or until they're a deep golden brown. Yield: 16 to 20 bagels, depending on size.


Additional Notes, also from King Arthur Flour: We used non-diastatic malt powder in place of the instant malted milk powder. You can use diastatic malt powder, but given the somewhat volatile nature of this ingredient -- used in too great a quantity, it'll "melt" the structure of your dough -- we prefer the non-diastatic. Malt powder not only gives the bagels a good taste; when used in the water bath it gives them a shiny crust.


You can use a doughnut cutter to make bagels; it's an easy, quick method to shape nice-looking bagels. If you've made the full recipe, divide the dough in half. Working with one half at a time, roll the dough out to a 9-inch circle, and cut as many bagels as you can. Gather the scraps and cut more bagels; you should end up with about 10. Repeat with the remaining piece of dough.


After you've boiled the bagels, and before you bake them, you may sprinkle them with sesame seeds, poppy seeds, caraway seeds, coarse salt, or whatever you wish. Bagels brushed with a bit of beaten egg white before topping will be shinier, and hold onto their topping better. 


To make flavored bagels, add ingredients to the dough before kneading. Bits of cooked spinach or fresh chive or garlic, diced onions, cinnamon and raisins are all popular.

Tuesday, January 12, 2016

School Lunches

Holidays are over, New Year came and went.  As soon as the holiday chaos ends, the regular chaos starts again.  Kids go back in school.  James goes back to work.  This means scheduling, uniforms, backpacks, homework, laundry, sports bags, after school stuff, daily showering, early breakfasts, school snacks, school lunches, and after school snacks. Ugh.  I saw quite a few posts on social media about parents being excited to send the kids back to school.  I'm not excited.  I like it when the kids are home with me.


But, to take the edge off of the chaos, I engage in a champagne and yoga pants moment and do some brainstorming for the school lunches, snacks, breakfasts and after school snacks.  It's all about advanced planning and taking advantage of your chest freezer.  Make a schedule, ask the family for input, and make make a list.  All this do ahead planning will save you time in the long run, so you're not running out to the grocery store every day.


My oldest son Zade, is a really picky eater.  And, he doesn't like the hot lunch that is provided at the school, except for every other week, when he gets pizza.  So, it's up to me to make sure he gets a lunch that he likes enough to eat.  He also needs routine in his meals, and a balance of textures and colors.  First thing I do is get the kid involved.  "Zade, what are your favorite foods?"
"Pizza, hot dogs, mac and cheese."
I can work with that.
"What do you like having for lunch?"
"Peanut butter sandwich and bagels with cream cheese"
Done.  That sounds like 5 lunches to me.  Pizza. Hot dogs. Mac and cheese. Peanut butter sandwich. Bagels with cream cheese.


Next, take the kid grocery shopping.  Don't forget the list you made, and your resusable shopping bags. This is not a hassle, this is GREAT!  Having the kid next to you gets him to choose his fruits, veggies and snacks.  They might also surprise you, when I say, "Choose a veggie to have with chicken for dinner" he eagerly gets the broccoli.  Or, "find the fruit for your lunch this week" and he says, "apples!" My thinking is that I can give him the power to choose his foods, so he's more likely to eat them.  Even if he eats half of his lunch, it's a success.  At the end of the day Zade has chosen the following side dishes: mini Fuji apples, baby carrots, Babybel cheese, pistachios and "chocolate mushrooms".  We take everything home and I finalize my plan.


Tuesday: Homemade bagels with cream cheese
Thursday: peanut butter sandwich
Friday: alternates weekly with school hot lunch (pizza) and hot dog from home.


I balance each main course with either a fruit or veg, something crunchy, and a dessert.  Which, for the time being is, pistachios and "chocolate mushrooms " respectively.  School snack is the Babybel cheese and either the fruit or veg, whatever isn't in the lunch, I also throw in something leftover from breakfast.  Planning and shopping DONE!  Now to start cooking!

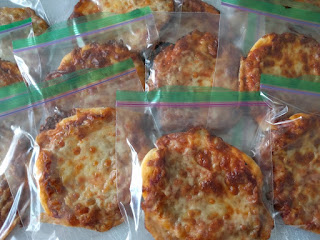
It takes up to a day to prep everything. I suggest starting early, having good background noise, wearing slippers, and having an easy dinner planned.  By the end of the day you might be sick of cooking. First thing I make is the mini cheese pizzas.  When there is a "break", maybe when the dough is rising, I prep something else, like making the pizza sauce, or grating the cheese for the mac and cheese. Multitasking is great when you've practiced these dishes over and over again. Otherwise, stick to one dish at a time. You won't get overwhelmed, and each dish will turn out nicely. Remember, you're making lunch for about a month, maybe 6 weeks, so there is a lot of work involved.


When your pizzas and mac and cheese are done, let them cool. While they're cooling, take a break, pop the bubbly if you have to. Sample the mac and cheese and pizza. Next on the to do list is homemade bagels and portioning the food, so you're going to need your energy. Take a break and reward yourself. Prep the bagel dough, and as it's rising, start portioning your other food. Put each pizza in a baggie, and store them in the freezer. Put the mac and cheese in take out boxes and then in the freezer. Separate the baby carrots, and pistachio's into snack size baggies. While you're at it, make some smaller to go cups with cream cheese. Finish baking the bagels, and then you're good to go!